Sunday, June 17, 2012

Blueberry Lemon Cake for Father's Day

Happy Father's Day! My father is my hero, and therefore deserves his hearts desire on Father's Day. As a kid I knew him as Daddy Rambo Russ. He sent post cards of his adventures swimming with whales and slaying dragons during deployment in the military. I was too old to admit before I realized these were just stories meant to connect with a young daughter that was far away. However, he will always be my hero, and heroes deserve special treats every day, but especially on Father's Day. So I set out to make him something special. I got the idea months ago from http://www.thecakeblog.com/.

The repice I used is here : http://www.thecakeblog.com/2011/08/blueberry-rainbow-cake.html

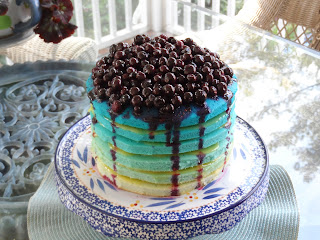
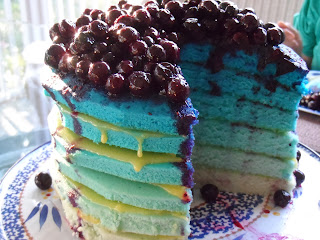
The cake has six layers of gradient color from light blue to dark blue. Mine went from more of a light green to dark teal. However, I think it turned out pretty great.


This recipe was slightly difficult because it used grams, and I doubled it so that I could get 6 layers with 8 inch cake pans. I am not entirely sure I converted all of the measurements correctly.

I started with 9 egg whites, 17 ounced of milk and 3 teaspoons vanilla.


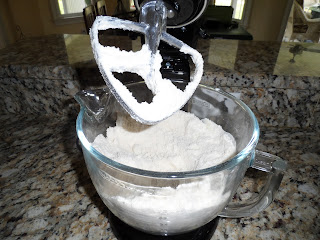
Followed by 4 cups flour, 3 cups sugar, 2 2/3 teaspoons baking powder, 1/2 teaspoon salt and 12 ounces unsalted butter.


Once these were combined, I set about coloring six bowls of batter. My biggest fan is my father, and Father's Day or not, he loves to watch me make my creations.


I added one drop of color for the first bowl, two for the next and so on. However, I ended up adding 15 drops to the last bowl to get it dark enough. At that point I began to get nervous that the icing color would make the cake bitter, so I stopped there.


These were popped in the oven at 350 degrees for 25 minutes.

At this point I started making Lemon Curd for each layer of cake. I used Alton Brown's recipe. http://www.foodnetwork.com/recipes/alton-brown/lemon-curd-recipe/index.html

Be warned any time something says it will take 8 minutes of whisking to thicken, you are looking at a half hour. Hope you have been working out your arms.


This stuff is shockingly simple to make (aside from the arm workout), and is super tasty.

At this point it was time for assembly. I cut the browned edges off of each layer of cake so that you would see the bright color on the inside. A knife proved to be a bad option, and believe it or not kitchen scissors helped me to acheive nice round edges on each layer.

I topped the cake with blueberries that had been cooked down in sugar on the stove top. This was a huge hit with the my hero, greatest supporter and Dad! (P.S. Mom liked it too!)


Wednesday, February 1, 2012

Birthday Baking

The holidays completely slowed down any and all blogging. However, two recent birthdays brought about some new ideas.

A close freind's birthday required a treat as strong, sassy and pulled together as she is. Plus, it had to be a "To Go" treat as her birthday party was on wheels. Literally. I decided to create cake pops in red with touches of silver and white. I used a design idea that is meant for royal icing, but that ended up working decently with chocolate to make flowers.


First, I filled a decorating bag with white candy melts and added a #1 round tip. I then piped the outline of the flower on the cake pop. Then I used a paint brush that had been sitting in warm water to pull the petals down to the center. Finally, I piped the center of the flower onto the cake pop. Once I was feeling confident I even added leaves.


These were my final product.


The Rooster's daughter is turning 10, and I came up with a few cupcakes to celebrate being a decade old. His daughter and son love eating mini oreos at their Mimi's house. So I figured that oreo cupcakes were in order. Happy Birthday was piped onto a double stuff atop each cupcake. The cupcakes with her initials were all hers!


Shaky piping work is great for cake pop flowers. Not so great for writing letters. Things to work on!

Monday, December 5, 2011

Little Monster

I found an awesome cake idea to make a monster cake, and had to make it for my favorite little monster who turns five years old this week (http://www.bakerella.com/pop-star-jennifer/).


Monday, November 21, 2011

Turkey's & A Pumpkin Patch

The Holiday's just seem to lend themselves to all things tacky. I will not be getting out my rudolph sweatshirt, accept of course for an ugly sweater party, but I did make my first character cake pops. Here's my attempt at turkeys and pumpkins. Happy Thanksgiving!

It might have been just as much fun finding just the right sprinkles and candies to complete the turkey beaks, eyes and feathers as it was to make these little guys. I chose Whoppers for the turkey heads, chocolate candy coated sunflower seeds for the beaks, leaf shaped red sprinkles for the distinctly turkey wattle, and some Duff black chocolate for the eyes.


As creepy as my little turkey heads are laying around body-less, I was delighted at how they came out.


For the tail feathers I used sour patch kids. Bakerella (http://www.bakerella.com/) used candy corn, which I thought was a great idea, but I was looking for something I could attach together so that I could put the tail on in one motion.


I made some cuts and pressed the cut edges together to make one colorful turkey tail.


I had lofty goals of adding little feat to my turkeys with yellow leaf sprinkles, but abandoned the idea when I realized the balancing act required to get the head and tail to stick to the cake pop chocolate. I realize I could have made the cake pop and then attached the head and tail with chocolate afterward, but I thought they would look more seemless if I attached the head and tail directly to the unsolidified chocolate covering. Oh by the way, these are red velvet cake pops. I love red velvet, and realized too late that I was having a Stell Magnolia's moment. Remember the bleeding armadillo cake?

Here are my turkeys!


The pumpkins were obviously much more simple. I used the stems from holly berry sprinkles, and some more of those candy coated sunflower seeds for my pumpkin stems.


Some of my pumpkins had some leaves fall on them.


I loved making these! I hope the recievers of these turkey's and pumpkins enjoy eating them as much as I enjoyed creating them.

Monday, November 7, 2011

Chicken & Dumplings

I decided to try my hand at chicken and dumplings. It fits all my major requirements for a go to meal. It's was super easy, fast, cheap and delicious. I buy chicken breasts in the bulk packages, put them in individual baggies and freeze them. They are cheap and when all else fails they make for a healthy dinner. However, chicken breasts are boring. So I find myself always looking for a halfway decent way to cook chicken breasts. Now, I'm aware proper chicken and dumplings requires that you cook a whole chicken, but this is the healthier weeknight version.


I started with a chopped onion, several stalks of chopped celery, chopped carrots and garlic. I confess all I had on hand were baby carrots, and for the record they were an annoying thing to chop. When I cook I freeze leftover chopped onion and other freezable veggies. In this case I already had chopped onion and celery. I find that Rachel Ray's dishes would be 30 minutes if it weren't for all the ingredients that have to be chopped. Maybe she secretly chops and freezes her onions and celery ahead of time too!


From here I added 8 cups of chicken broth. I use Better Than Bouillon. It's cheaper than boxed chicken broth and more flavorful than bouillon cubes. Plus, I find that it has enough salt that recipes with it don't require much if any added salt. If you use regular chicken broth for this, you will likely need salt. In the broth veggie mix I added 2 large chicken breasts, and boiled them. Once shredded, they came to about 5 cups of shredded chicken.


I added my chicken to the pot, and then I added a quarter cup of Sherry for an added zing and half a cup of fat free half and half. Certainly real half and half is great on special occasions, but as I said this is the weeknight version. I then added a quarter teaspoon black pepper, 1 teaspoon thyme and 1 teaspoon poultry seasoning.

Somewhere in this process, I did make dumplings as well. See the aforementioned pierogie dough for the recipe in a previous blog. Two cups flour, one teaspoon salt, one egg and water. I debated on rolling this out, but opted for just pulling pieces of dough and plopping them into the soup. Why make a bigger mess?

So Chicken and Dumplings absolutely lends itself to a lot of butter and or a roux of flour and butter. However, I opted to add about 4 tablespoons of cornstarch to thicken up the "gravy" a bit.


The Rooster informed me as I started chopping that he didn't like chicken and dumplings, but in the end he ate two bowls. I take this to mean he liked my chicken and dumplings. It was a success!

Chicken & Dumplings:
1 Medium Onion Chopped
2 Celery Stalks Chopped
Half Cup Chopped Carrot
2 Garlic Cloves Chopped
2 Tablespoons Olive Oil to Cook Veggies
5 Cups Shredded Chicken / Two Large Chicken Breasts
8 Cups Chicken Broth
1/4 Cup Sherry
1/2 Cup Half and Half (Fat Free Works Fine)
1/4 Teaspoon Pepper
1 Teaspoon Thyme
1 Teaspoon Poultry Seasoning
4 Tablespoons Cornstarch

Dumpling:
2 Cups Flour
1 Teaspoon Salt
1 Egg
Water

Tuesday, October 25, 2011

My First Fondant

First, I must say that the below picture is of a rather pathetic attempt at a cake. However, in my defense, it was my first for a lot of things. Most notably it was my first attempt at Fondant and at a two tier cake as well. It is The Rooster's birthday and I wanted to create a special cake for his family get together. Plus, it was a good excuse to make a big fun cake. Before you take a long hard look at this picture, I would like to mention that it is not at all the design I came up with. In fact, as I stared at it unhappily prior to leaving for his family gathering, The Rooster himself finalized the design by lining up all of the little anchors. The good news is that this made all the anchors readily accessible to all the kids, who ate them all as soon as they were granted permission!


I have never used any fondant before, store bought or otherwise. However, I chose to torture myself by making my own homemade Marshmallow Fondant. It was not only fun to make, but exceptionally easy. The recipe is readily available online. I also decided to carve these complicated little anchors by hand. What was I thinking? I was too skittish to cover the whole cake in fondant, so the blue is all buttercream. Next time I will attempt to cover the whole cake.

Despite its screaming imperfections, it was still super delicious if I do say so myself. I'm looking forward to the next cake adventure. Can't wait actually!

Thursday, October 13, 2011

The Ultimate Comfort Food

Everyone has a favorite comfort food. Growing up my Mom would give me scrambled eggs and toast whenever I was sick. To this day nothing is more comforting to me than breakfast food. While I like macaroni and cheese and chicken pot pie as much as the next guy, the only other food that warms my soul is a pierogie.
As the only surviving member of her family after the holocaust, one of my grandmother’s few childhood memories is of making pierogies. I’ve been making them with her and my mother my entire life.

It has been at least a couple years since I tackled them alone in my own kitchen. So here goes!
Dough-
2 Cups Flour
1/4 Teaspoon Salt

1 Egg
Water
Filling-
5 Russet Potatoes Peeled and Chopped
1 Medium Yellow Onion
6 Bacon Strips
Start by making your filling. Boil potatoes until tender, drain and smash them. In another pan cook your bacon, set aside and crumble, reserving a tablespoon of bacon grease in your pan. Cook onion in the bacon grease until translucent and then add your potatoes and crumbled bacon to your onions and mix. Resist the urge to add sour cream or milk to this as you want your filling to be pretty dry so that it doesn’t compromise your dough. Some people do add cheese, but that’s just not how Grandma did it, so I don’t. You will have more filling than dough for this recipe, but you can continue to make batches of dough as needed.
Now it’s time to tackle the dough. Simple ingredients aside, it can be a little tricky. I make a little well in my flour and add the egg and about 6 tablespoons of water. Then I get dirty, and work this all together with my hands. I add tablespoons of water until the dough is slightly tacky and gooey but forms into a ball. I find the sweet spot is about 12 to 13 tablespoons of water. Why tablespoons? As grandma says, you can always add more water but you can’t take it out. I hear people like to add oil to the dough, but why add more fat when it doesn’t improve the taste or consistency of the dough. You’re about to eat starch, filled with starch, with bacon on top.

I cut this amount of dough in half and leave one half sitting in the bowl covered by a towel. It does dry out easily. Flour your surface generously, and plop your gummy dough ball into the flour and need it until it comes together smoothly. Rolling this out is like rolling out a ball of semi dry glue. Have some patience. It needs to be about an eighth of an inch thick or so. If your dough is too thick, your pierogies will be too dumpling like. Conversely, if it is too thin, the pierogies will tear in the cooking process and turn into mush.
I use the mouth of a cup to make circles in the dough. You can make them however big or small you want. I won’t judge you. The size I make mine requires that I use a heaping teaspoon or so of filling. Place the filling in the center of your dough circle and then fold it in half and press the edges together. I find it’s easier to cup the dough and filling in one hand and press the edges together with the other. If the edges won’t come together, rub a little water on the inside edges of your pierogie.

Place your finished pierogies on a cookie sheet lined with parchment paper. You can then freeze any extras this way. Once they are completely frozen you can plop them into a bag in the freezer without worry that they will stick. Making these has obviously been time consuming. However, once you have a frozen stash, they make for one of the fastest meals in the kitchen. I actually stick them in the freezer for 15 minutes or so before cooking them. I find it helps keep them from falling apart.
Look it's not a sexy food, it's a comfort food. They arn't pretty, and mine really arn't pretty. But boy are they good!
Boil a large pot of water and gently put them in. When they float to the top they are done. At the size below they only take a couple of minutes. Yes that’s kielbasa at the bottom. It’s a hot dog for grown-ups, how could I forget it! I know people like to then fry Pierogies in a pan, but again grandma doesn’t, so I don’t.

Plate up and enjoy!